Sunday, November 20, 2016
Get Tape Serial Num in Linux
[root@vmbackup dev]# sg_inq /dev/st0 standard INQUIRY: PQual=0 Device_type=1 RMB=1 \[ANSI_version=3] version=0x03 \[AERC=0] \[TrmTsk=0] NormACA=0 HiSUP=0 Resp_data_format=2 SCCS=0 ACC=0 ALUA=0 3PC=0 Protect=0 BQue=0 EncServ=0 MultiP=0 MChngr=0 \[ACKREQQ=0] Addr16=1 \[RelAdr=0] WBus16=1 Sync=1 Linked=0 \[TranDis=0] CmdQue=0 Clocking=0x3 QAS=0 IUS=0 length=96 (0x60) Peripheral device type: tape Vendor identification: HP Product identification: Ultrium 2-SCSI Product revision level: F48D Product serial number: HUL3M04080
Forcefully unmount a Linux disk partition
How do I forcefully unmount a Linux disk partition? It happens many times you try to unmount a disk partition or mounted CD/DVD disk and if you try to unmount device, which is accessed by other users, then you will get error umount: /xxx: device is busy. However, Linux/FreeBSD comes with fuser command to kill forcefully mounted partition. Understanding device error busy error What happens basically, is that Linux / UNIX will not allow you to unmount a device that is busy. There are many reasons for this (such as program accessing partition or open file) , but the most important one is to prevent data loss. Try the following command to find out what processes have activities on the device/partition. If your device name is /dev/sdb1, enter the following command as root user: # lsof | grep '/dev/sda1' Output: vi 4453 vivek 3u BLK 8,1 8167 /dev/sda1Above output tells that user vivek has a vi process running that is using /dev/sda1. All you have to do is stop vi process and run umount again. As soon as that program terminates its task, the device will no longer be busy and you can unmount it with the following command: # umount /dev/sda1 Following disussion allows you to unmout device and partition forcefully using Linux commands. Linux fuser command to forcefully unmount a disk partition Suppose you have /dev/sda1 mounted on /mnt directory then you can use fuser command as follows: WARNING! These examples may result into data loss if not executed properly (see "Understanding device error busy error" for more information). Type the command to unmount /mnt forcefully: # fuser -km /mnt Where, -k : Kill processes accessing the file. -m : Name specifies a file on a mounted file system or a block device that is mounted. In above example you are using /mnt Linux umount command to unmount a disk partition You can also try umount command with –l option: # umount -l /mnt Where, -l : Also known as Lazy unmount. Detach the filesystem from the filesystem hierarchy now, and cleanup all references to the filesystem as soon as it is not busy anymore. This option works with kernel version 2.4.11+ and above only. If you would like to unmount a NFS mount point then try following command: # umount -f /mnt Where, -f: Force unmount in case of an unreachable NFS system Caution: Using these commands or option can cause data loss for open files; programs which access files after the file system has been unmounted will get an error.
How to Reset "root" Password with GRUB on Enterprise Linux
How to Reset "root" Password with GRUB on Enterprise Linux If somehow you have lost the password for the system administrator user "root" you will need to reset it. This document provides a practical method to do that if you have configured system with the GRUB boot loader during the OS installation. It procedure is to boot the system in the "single user" mode and to be able to do that you must be on the system console. Please follow the steps below: 1. Reboot the system 2. When the GRUB menu is shown with list of kernels to boot or count down for boot kernel is seen immediately do the following. 3. Use the arrow key and choose the kernel you want to boot 4. Press key a to append kernel arguments before booting 5. Next line will look something like this: grub append> ro root=/dev/VolGroup00/LogVol00 rhgb quiet 6. At the end of the line press space bar once, then add text single or 1: grub append> ro root=/dev/VolGroup00/LogVol00 rhgb quiet single or grub append> ro root=/dev/VolGroup00/LogVol00 rhgb quiet 1 7. Then press enter/return, system will start to boot. The esc key will cancel your edit. 8. This will bring you to a shell prompt and now you can use the passwd command to change the password for the "root" account: sh-3.00## passwd Changing password for user root. New UNIX password: ... ... After the password is reset type # reboot and after system has been completed booting you can logon with the new root password.
How to Close and Open Ports with iptables
How to Close and Open Ports with iptables Linux dedicated servers typically rely a software firewall system called iptables. With it you can control which ports allow inbound and/or outbound access. It is very important to have iptables configured properly, both for your server’s functionality and for its security. There are many tools, both command-line based and web-based that allow you to control and configure iptables. In some cases, particularly emergency situations, you may still prefer or need to use the command line. In such situations, here is an easy guide to follow. As an example, let’s suppose you want to open the TCP port 25 for your SMTP server. 1. Login to your server via SSH 2. Become root: su 3. Enter the following command: iptables -A INPUT -p tcp --dport 25 -j ACCEPT On the other hand, if you wanted to close access to the same port, you would enter: iptables -A INPUT -p tcp --dport 25 -j DROP Once you are finished, save and restart iptables /etc/init.d/iptables save /etc/init.d/iptables restart Notes: 1. Some Linux distributions, such as Red Hat Enterprise Linux and CentOS provide basic iptables management through the “setup” program. Simply run “setup” as root and configure the firewall. 2. If your server uses a web-based control panel to configure the firewall, it is not a good idea to manually play with it except in cases of emergency where you cannot access services (such as the web). 3. Some iptables management software allows you to control it without actually having to use the iptables command.
Tools to Monitor Linux Performance
Linux/Unix System administrators need to monitor and debug Linux System Performance problems every day. It is very hard to monitor and keep systems up and running without using proper tools or utilities. Below are some frequently used command line monitoring tools that might be useful for every Linux/Unix System Administrator. These commands are available under all flavors of Linux and can be useful to monitor and find the actual causes of performance problem.
1. lsof (List Open Files)
Lsof command used in many Linux/Unix like system that is used to display list of all the open files and the processes. The open files included are disk files, network sockets, pipes, devices and processes. One of the main reason for using this command is when a disk cannot be unmounted and displays the error that files are being used or opened. With this command you can easily identify which files are in use. The most common format for this command is.

2. tcpdump (Network Packet Analyzer)
tpdump is one of the most widely used command-line network packet analyzer or packets sniffer program that is used to capture or filter TCP/IP packets which are received or transferred on a specific interface over the network. It also provides a option to save captured packages in a file for later analysis. tcpdump is almost available in all major Linux distributions.

3. netstat (Network Statistics)
Netstat is a command line tool for monitoring incoming and outgoing network packets statistics as well as interface statistics. It is very useful tool for every system administrator to monitor network performance and troubleshoot network related problems.

4. top (Linux Process Monitoring)
Linux Top command is a performance monitoring program which is used frequently by many system administrators to monitor Linux performance and it is available under many Linux/Unix like operating systems. The top command used to display all the running and active real-time processes in ordered list and refreshes regularly. It display CPU usage, Memory usage, Swap Memory, Cache Size, Buffer Size, Process PID, User, Commands and much more. It also shows high memory and cpu utilization of a running processess. The top command is much useful for system administrator to monitor and take correct action when required.

5. vmstat (Virtual Memory Statistics)
Linux VmStat command used to display statistics of virtual memory, kernel threads, disks, system processes, I/O blocks, interrupts, CPU activity and much more. By default vmstat command is not available under Linux systems you need to install a package called sysstat that includes a vmstat program. The common usage of command format is.

6. iostat (Input/Output Statistics)
IoStat is simple tool that collects and shows system input and output storage device statistics. This tool is often used to trace storage device performance issues including devices, local disks, remote disks such as NFS.

1. lsof (List Open Files)
Lsof command used in many Linux/Unix like system that is used to display list of all the open files and the processes. The open files included are disk files, network sockets, pipes, devices and processes. One of the main reason for using this command is when a disk cannot be unmounted and displays the error that files are being used or opened. With this command you can easily identify which files are in use. The most common format for this command is.
2. tcpdump (Network Packet Analyzer)
tpdump is one of the most widely used command-line network packet analyzer or packets sniffer program that is used to capture or filter TCP/IP packets which are received or transferred on a specific interface over the network. It also provides a option to save captured packages in a file for later analysis. tcpdump is almost available in all major Linux distributions.
3. netstat (Network Statistics)
Netstat is a command line tool for monitoring incoming and outgoing network packets statistics as well as interface statistics. It is very useful tool for every system administrator to monitor network performance and troubleshoot network related problems.
4. top (Linux Process Monitoring)
Linux Top command is a performance monitoring program which is used frequently by many system administrators to monitor Linux performance and it is available under many Linux/Unix like operating systems. The top command used to display all the running and active real-time processes in ordered list and refreshes regularly. It display CPU usage, Memory usage, Swap Memory, Cache Size, Buffer Size, Process PID, User, Commands and much more. It also shows high memory and cpu utilization of a running processess. The top command is much useful for system administrator to monitor and take correct action when required.
5. vmstat (Virtual Memory Statistics)
Linux VmStat command used to display statistics of virtual memory, kernel threads, disks, system processes, I/O blocks, interrupts, CPU activity and much more. By default vmstat command is not available under Linux systems you need to install a package called sysstat that includes a vmstat program. The common usage of command format is.
6. iostat (Input/Output Statistics)
IoStat is simple tool that collects and shows system input and output storage device statistics. This tool is often used to trace storage device performance issues including devices, local disks, remote disks such as NFS.
Saturday, November 19, 2016
Converting A VMware Image To A Physical Machine
Converting A VMware Image To A Physical Machine
This tutorial shows how to convert an existing CentOS VM to a Physical machine. This tutorial covers the cloning of the VM to an unpartitioned HDD and troubleshoot some of the possible errors that you may have booting the OS on your new hardware. To illustrate this procedure I will use VMware Workstation 7 as the handler to transfer the VM installation to a physical HDD.
1 Requirements
To perform this procedure you will need:
• VMware Workstation, VMware Server or VMware Player.
• CloneZilla ISO image.
• Unpartitioned HDD with enough space to hold your VM image.
2 Preliminary Notes
This tutorial assumes basic knowledge of the cloning process and requires no previous experience on the use of Clonezilla. Make sure your OS is not using in any way the target HDD that will hold your final copy of the VM, otherwise VMware will complain about your disk been in use and CloneZilla will not perform a successful copy of the VM.
3 VMware Configuration
First thing is to make sure your virtual CD/DVD is using your CloneZilla ISO image to boot. Next add your physical HDD as part of your existing VM by clicking the Add button.

Select Hard Drive and click Next.

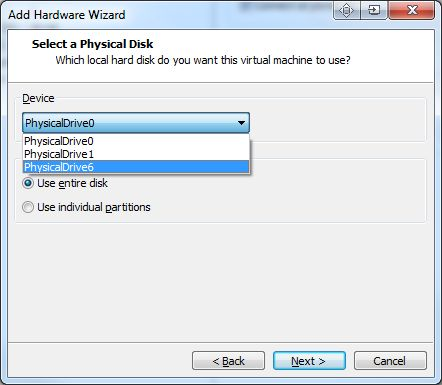
Select Use physical disk (for advanced users) then click Next.

Make sure you select the correct drive that you want to use for your physical disk and select the option Use entire disk.
Finally give a name to your configuration file then click Finish.

Make sure your final VMware hardware list include this two elements otherwise, start all over.

4 CloneZilla Cloning Process
Start your VMware and boot from your virtual ISO into CloneZilla image. Use the Live option with default settings.

Select your preferred language and continue.

Accept the default option Don't touch keymap and continue.

Select Start_clonezilla and continue.

Select device-device option and continue.

Select Beginner mode and continue.

Select disk to local disk and continue.

Select your source disk and click OK.

Select your target disk and click OK, then press Enter to continue.

You will be presented with a warning, about your existing data on your target disk will be lost, make sure there's nothing usable on your disk before you continue.

You will be presented with a series of questions answer yes to all this prompts.

The cloning process may take a long time.

After the cloning process is finished hit Enter and power off the VM by pressing 0 on the CloneZilla menu.

The cloning process is complete, is now time to install your new HDD to your physical machine.
5 Troubleshooting Physical Machine
More likely your first encounter with your cloned OS will be a filesystem corruption, with the following error: Unexpected Inconsistency. To fix this problem enter your root password and run fsck -y to start the filesystem repair process. The -y answers yes to the questions the fsck command will probably output.

Your next challenge will be fixing your NIC, I have used two different methods to fix this problem.
Go into /etc/udev/rules.d and delete the file 70-persistent-net.rules then reboot. Deleting the file forces the detection process to run again at boot with no baggage left over from the cloning process.
The other way to fix this problem is by edit: /etc/sysconfig/network-scripts/ifcfg-eth0 and add the MAC address of your new NIC.
Open eth0 using vi, type:
vi /etc/sysconfig/network-scripts/ifcfg-eth0
Edit the following line:
HWADDR=
This is my sample config file:
# Micro-Star INT'L CO Gigabit Ethernet Controller
DEVICE=eth0
BOOTPROTO=static
DHCPCLASS=
HWADDR=00:19:B1:2A:BA:B8
IPADDR=10.10.11.50
NETMASK=255.255.255.192
ONBOOT=yes
Save and close the file then reboot the server:
reboot
The system is now ready to be used.
Enabling the VMware vSphere Hot-plug CPU & Hot-Add RAM Feature
Enabling the VMware vSphere Hot-plug CPU & Hot-Add RAM Feature
VMware vSphere’s hot-add Memory and hot-plug CPU functions allow you to add the CPU and Memory while virtual machine is up and running. It will help you to add the additional resources whenever required and no need to bring down the VM for each time. But you can’t remove the resources once you have added the VM while it’s running.
To enable the hot-plug CPU and Hot-add RAM on existing VM.
1. Login to the VMware vSphere Client and Halt the VM.
2. Right click the VM and edit the virtual machine settings.
3. Expand the CPU tab.
4. Navigate to CPU hot Plug option.
5. Select the “Enable CPU Hot Add” Box.
6. Same way you can configure for memory as well. Just enable the Memory Hot plug.

Reference: http://kb.vmware.com/selfservice/microsites/search.do?language=en_US&cmd=displayKC&externalId=2020993
Subscribe to:
Posts (Atom)
-
 How to boot a Windows VM into Safe Mode in ESX Information: 1) Right Click the VM 2) Select Edit Settings a. Click Option...
 -
SPARC platforms that support the Oracle VM Server for SPARC software come preinstalled with the Oracle Solaris 10 OS or the Oracle Solaris 1...
-
Use this procedure to enable the ldmd daemon if it has been disabled. Use the svcadm command to enable the Logical Domains Manager daemon,...